Windows Keyboard Tester: Your Ultimate Guide to Keyboard Testing
Have you ever been typing away on your Windows computer, only to notice that your keyboard isn’t responding quite like it used to? Maybe your favorite key is sticking, or perhaps some keys are unresponsive altogether. Don’t worry; testing your keyboard is easier than you think! This guide will walk you through the various methods of checking your keyboard’s functionality.
Common Keyboard Issues to Look Out For
Keyboards are essential tools for both work and leisure, but they can encounter a variety of issues that disrupt your experience. Here are some common keyboard problems to be aware of, along with troubleshooting tips to help you resolve them.
Unresponsive Keys
One of the most frustrating issues is when certain keys fail to respond. This can occur due to dirt or debris lodged beneath the keys, or it may be a software-related problem. To troubleshoot:
-
- Clean the Keyboard: Use compressed air or a soft brush to remove any visible debris.
-
- Restart Your Computer: Sometimes, a simple reboot can resolve software glitches.
-
- Check Connections: For wired keyboards, ensure the connection is secure; for wireless, verify battery levels and Bluetooth settings.
Sticky Keys
Sticky keys can lead to repeated characters being inputted when you press a key only once. This issue often arises from spills or dirt accumulation. To fix sticky keys:
-
- Disconnect and Clean: Turn off your computer, disconnect the keyboard, and gently tap it upside down to dislodge debris.
-
- Use Compressed Air: Blow out any dirt without using excessive force that could damage components.
Ghost Typing
Ghost typing occurs when random characters are input without any key presses. This can be due to stuck keys or connection issues. To troubleshoot:
-
- Inspect for Stuck Keys: Ensure all keys spring back up after being pressed.
-
- Reconnect the Keyboard: Disconnect and reconnect it to your computer.
Incorrect Character Output
If your keyboard types different characters than expected, it may be due to a mismatch in software layout settings. To resolve this:
-
- Adjust Keyboard Settings: Go to “Typing Settings” or “Language and Region” in your operating system and ensure the correct layout is selected.
Slow Response Times
If key presses are registering slowly, this could indicate dirt under the keys or sensitivity settings that need adjustment. To fix slow response times:
-
- Clean Around Keys: Remove the affected key and clean around it with a Q-tip and rubbing alcohol.
-
- Check Companion Apps: If your keyboard has an accompanying app, adjust the key actuation settings there if applicable.
Companion App Recognition Issues
Many advanced keyboards come with companion apps for customization. If your app fails to recognize the keyboard:
-
- Reconnect the Keyboard: Try unplugging and reconnecting it.
-
- Update Software: Ensure you have the latest version of the companion app installed.
By being aware of these common keyboard issues and their solutions, you can maintain a smoother typing experience and minimize disruptions in your workflow.
How to Use an Online Windows Keyboard Tester?
Using a keyboard tester is a straightforward process that can help you diagnose issues with your keyboard effectively. Whether you’re troubleshooting a malfunctioning key or simply ensuring all keys are functioning properly, follow these steps to make the most of your testing experience.
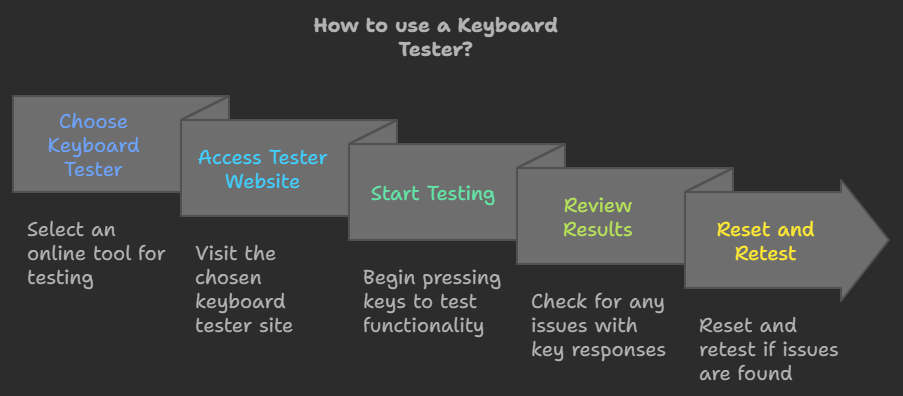
Step 01: Choose the Right Keyboard Tester
Select an online keyboard tester that suits your needs. Popular options include:
-
- Keyboards-Tester.com: A tool that allows you to test your Windows and MacBook keyboards, including all function and special keys, directly from your browser.
-
- Ratatype: A user-friendly tool that allows you to test all keys, including function and special keys, directly from your browser.
-
- KeyboardTester.io: Another reliable option that supports various keyboard layouts and is open-source.
Step 02: Access the Tester
Visit the website of your chosen keyboard tester. Ensure you are using a compatible browser like Google Chrome, Mozilla Firefox, or Microsoft Edge for optimal performance.
Step 03: Start Testing Your Keyboard
Once on the testing page:
Press Each Key: Begin by pressing each key on your keyboard one by one. As you press a key, observe the virtual keyboard displayed on the screen. Each pressed key should highlight in a designated color (e.g., green for functioning keys) to indicate it has been recognized.
Check Special Keys: Don’t forget to test special keys such as Caps Lock, Num Lock, and Scroll Lock to ensure they are functioning correctly.
Step 04: Review Results
After testing all keys:
-
- Check for Issues: Look for any keys that did not respond or showed unexpected behavior. This can help you identify if there are mechanical issues or software glitches affecting your keyboard’s performance.
-
- Assess Key Rollover and Ghosting: Some testers provide insights into how many keys can be pressed simultaneously without missing inputs (key rollover) and whether unpressed keys register (ghosting). These features are particularly important for gamers and fast typists. But in our tools it’s missing.
Step 05: Reset and Retest if Necessary
If you find issues during your initial test, consider resetting the virtual keyboard using the provided reset button and retesting specific keys or combinations that showed problems.
By following these steps, you can quickly diagnose and address any issues with your keyboard, ensuring a smoother typing experience.
Using Windows On-Screen Keyboard for Testing
Accessing the On-Screen Keyboard
To use the On-Screen Keyboard, simply press Windows + R to open the Run dialog, type osk, and hit Enter. A virtual keyboard will appear on your screen.
Features and Benefits of Using the On-Screen Keyboard
The On-Screen Keyboard allows you to test every key visually. When you press a key on your physical keyboard, you’ll see it highlighted on the on-screen version. It’s an effective way to identify which keys are working and which ones aren’t.
Troubleshooting Common Windows Keyboard Issues
Experiencing problems with your keyboard can be frustrating, but many issues are easy to diagnose and fix. Here are some common keyboard problems and their solutions:
Unresponsive Keys
If certain keys aren’t working, start by checking for debris or dust under the keys. Use compressed air to clean the keyboard. If that doesn’t help, try reconnecting the keyboard or testing it on another device to rule out hardware failure.
Keys Sticking or Repeating
Sticky keys can result from dirt buildup or mechanical wear. Clean around the affected keys and ensure they move freely. If a key repeats when pressed lightly, check for software settings that might affect key sensitivity.
Keyboard Not Recognized
If your keyboard isn’t recognized by your computer, check the connection (USB or Bluetooth). Try a different port or replace batteries for wireless keyboards. Restarting your computer can also resolve recognition issues.
Incorrect Key Mapping
Sometimes, keys may not correspond to their expected outputs due to incorrect settings. Check your keyboard layout settings in the operating system’s control panel and ensure it matches your physical keyboard.
People Also Asked
How can I test if my keyboard is working?
You can use any word processor or an online tester by pressing each key and observing if they register correctly.
What should I do if a key does not register during the test?
Check the connection first; clean the keyboard and try it on another device.
Are online keyboard testers safe to use?
Yes, most reputable online testers do not store any data you input during testing.
How often should I test my keyboard?
It’s good practice to test your keyboard every few months or whenever you notice issues.
What are the common problems with keyboards?
Common issues include unresponsive keys, sticky keys due to debris, or connectivity problems with wireless keyboards. This article provides a comprehensive overview of Windows keyboard testers, guiding users through understanding their importance, how to use them effectively, and troubleshooting common issues—all while ensuring an engaging reading experience!
Conclusion
Regularly testing your keyboard can save you time and frustration down the line. By utilizing these online tools, you can ensure that every key is working correctly, allowing you to focus on what really matters—your work or gaming experience!

Keyboards-Tester.com is a game-changer! I was having issues with a few keys on my keyboard and wasn’t sure which ones were malfunctioning. This tool made it incredibly easy to diagnose the problem in seconds. The interface is simple and intuitive, with clear instructions on how to test each key.
- Joshua Lee • Head of Technology

Great Tool!
I was messed up with some keys on my keyboard. I was trying to figure out which was making the mess and not working. It took me only one minute to check my keyboard.
- Billy Joe • Entrepreneur